Written by Tanya — Yoga Alliance RYS 200 (ID 252157), trained at Devvrat Yoga School, Varkala, India (December 2025). Tanya teaches Hatha and Yin yoga at Your Ritual Yoga in Golders Green, NW11.
Triangle pose is one of the most familiar shapes in yoga. It appears in almost every Hatha class, it looks straightforward from the outside, and most students have attempted it within their first few sessions. And yet it is one of the poses that benefits most from careful attention — because without a handful of specific cues, it can feel like little more than a sideways lean that leaves you wondering what you were supposed to be getting from it.
With those cues in place, Trikonasana becomes something else entirely: a full-body pose that opens the side body, strengthens the legs, rotates the thoracic spine, and asks the breath to do something more than just keep you upright.
What follows is an honest look at what triangle is actually for, six cues that tend to change everything, the most common mistakes, and how to use modifications so the pose works for your body rather than against it.
1. What Triangle Is For
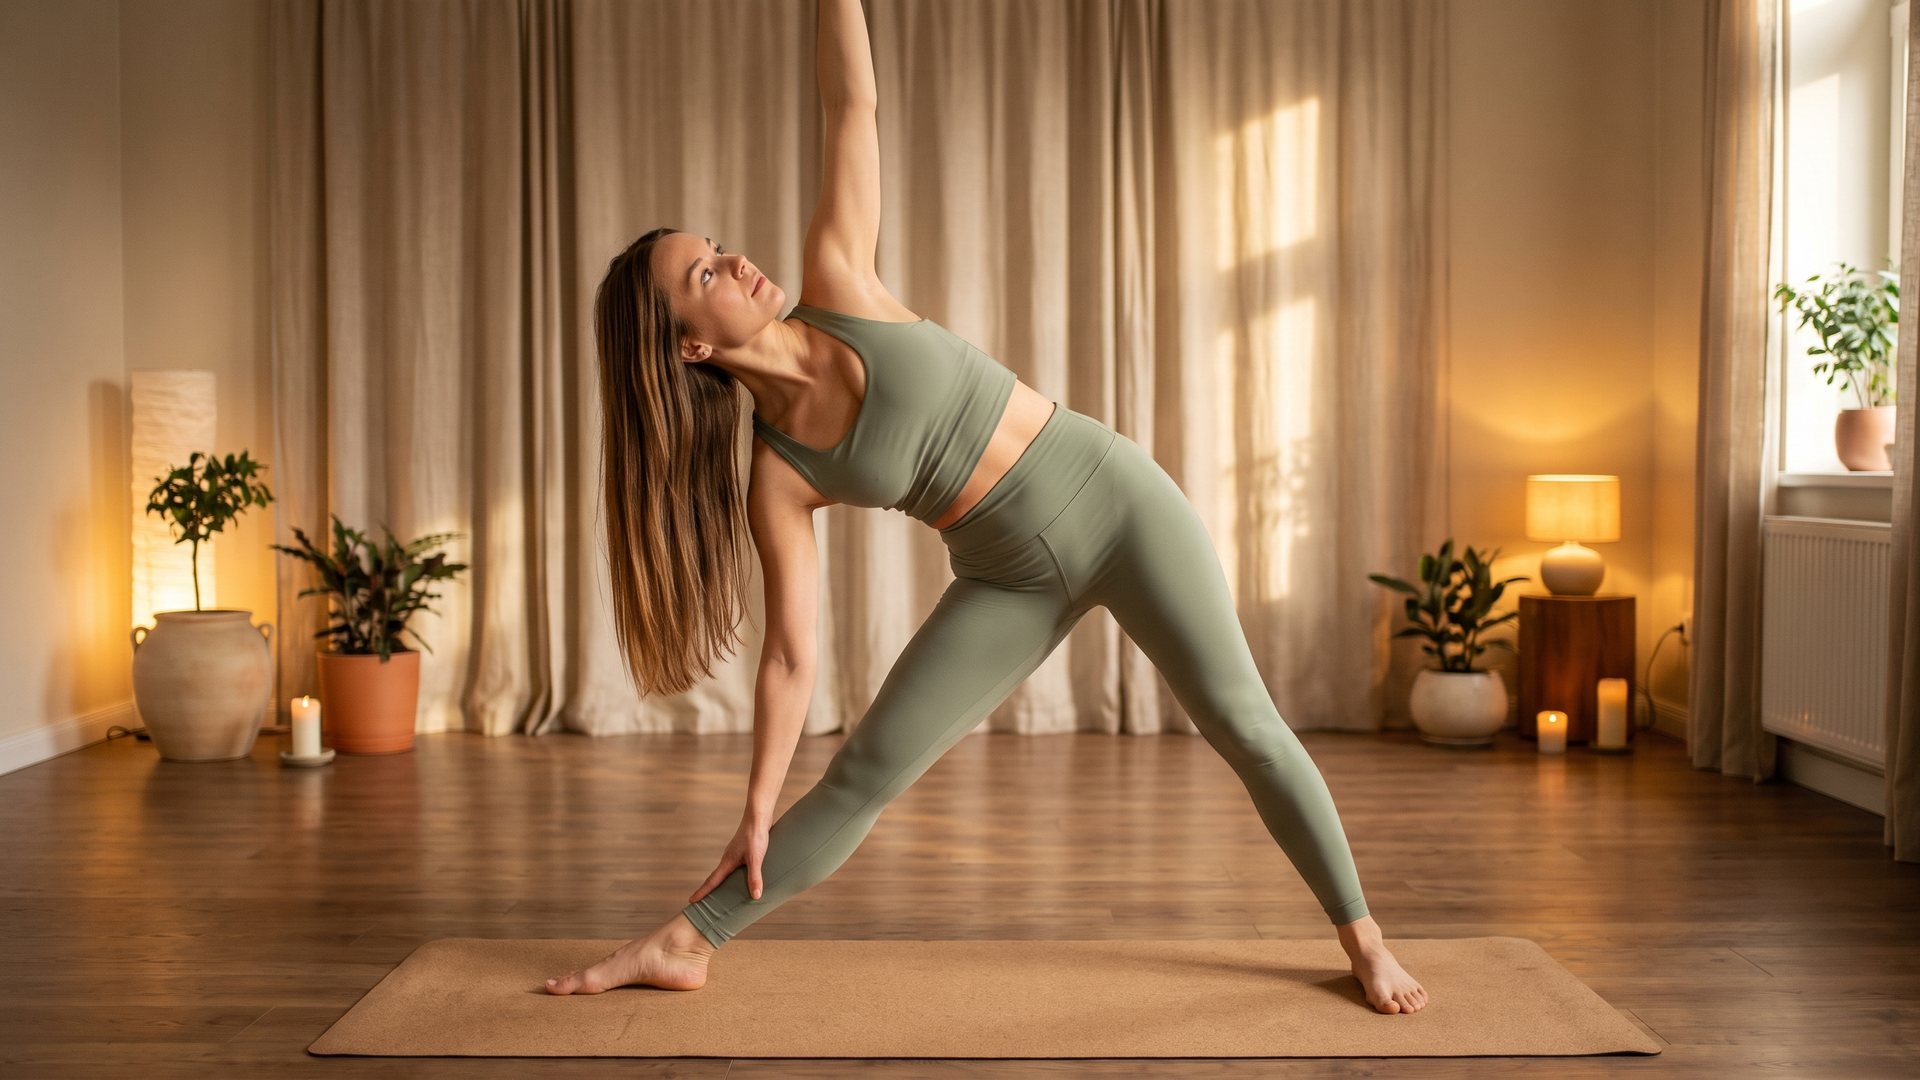
Trikonasana — from the Sanskrit trikona (three corners) and asana (pose) — is primarily a lateral extension and a rotation. It works:
- The side body: the intercostal muscles between the ribs, the obliques, the lateral hip
- The legs: the inner thighs, the hamstrings, the quadriceps (which work to keep the front knee straight)
- The thoracic spine: the rotation of the upper chest opens the thoracic region, which tends towards stiffness in people who sit for long hours
- The shoulder girdle: the upper arm reaching towards the ceiling creates space in the shoulder joint and opens the chest
It is also a balance pose in the sense that it requires the front and back legs to work together, and the whole structure to remain stable without locking or bracing. There is a quality of being held and holding simultaneously.
Functionally, Trikonasana is particularly useful for people with tightness in the lateral hip (the IT band, the TFL), the hamstrings, and the side of the waist — which describes a large proportion of people who spend most of their working day seated.
2. Six Cues That Change the Pose
Front foot vs back foot weight
This is perhaps the most consequential adjustment in Trikonasana, and it is rarely the first thing taught.
Begin standing with a wide stance — roughly one leg-length between your feet. Turn the right foot out to 90 degrees and the left foot in slightly (about 15–20 degrees). The heel of the front foot should be roughly aligned with the arch of the back foot, though this can be adjusted for comfort.
Now notice where your weight is. Many students let the weight fall forward into the front leg as they reach down. This collapses the pose. Instead, press evenly and actively through both feet — four corners of each foot (base of big toe, base of little toe, inner heel, outer heel) in contact with the floor.
The back foot and back leg are doing as much work as the front. The back outer edge of the foot presses firmly down. This engagement of the back leg stabilises the pelvis and gives the side body something to lengthen against.
Cue: “Press through the outer edge of your back foot as if you were trying to push the floor away.”
Ground through the back leg before you reach down
Most students reach the hand towards the floor as their first movement. This tends to produce a collapse — the torso bends forward rather than extending laterally, the front knee can buckle inward, and the side body shortens rather than lengthens.
Instead: extend the torso out over the front thigh first, as if lengthening the side waist towards the far wall, before allowing the hand to drop towards the shin or block. Think of the arm and the torso as one long line being extended horizontally before it tilts.
Cue: “Lead with the crown of your head before you lead with your hand.”
The front knee — not locked, not bent
The front knee in Trikonasana should be straight but not hyperextended. Hyperextension — where the knee bends backward past straight — compresses the back of the joint and is a common habit, particularly in hypermobile people.
If you tend towards hyperextension, soften the knee very slightly — not enough to create a visible bend, just enough that you feel the quadriceps working to hold the leg rather than the joint bearing the load passively.
Cue: “Engage the thigh. Feel the muscle working to hold the knee, rather than the joint locking into place.”
The lower hand belongs where it can be light
Many students try to get the hand as low as possible — to the floor, if they can reach it. But a hand that is gripping the floor for support is a hand that has lost its lightness, and a torso that has collapsed to make the reach possible has lost its length.
Place the hand on a block, on the shin, or even on the thigh — wherever it can rest lightly, without weight. The hand is resting; the legs and the core are working.
Cue: “Your lower hand should feel like a feather — touching, not pressing.”
Open the chest towards the ceiling
The upper arm reaches upward, and with it, the chest rotates to face the wall (or towards the ceiling). This rotation is where a large part of the therapeutic value of Trikonasana lives — the thoracic spine opens, the intercostals stretch, and the front of the shoulder broadens.
Many students let the upper shoulder roll forward, so that both shoulders are facing roughly downward. This collapses the rotation and reduces the opening. Draw the upper shoulder back and feel the chest rotating upward.
Cue: “Let the sternum face the wall. Let the top shoulder roll open.”
The breath moves the ribs
Once the structure of the pose is in place, the breath becomes an active participant. On each inhale, feel the ribs expand — particularly the upper ribs on the side facing the ceiling. On each exhale, feel the side body lengthen further without losing the structural support of the legs.
This is the moment when Trikonasana stops being a stretch and becomes a breath-led pose. The length in the side body is not forced — it is invited by the breath.
3. Common Mistakes
Reaching too far down. The most common. The hand belongs where the torso can remain long — not where it can reach. A block solves this entirely.
Front knee buckling inward. Usually a sign that the inner thigh muscles (adductors) are not engaged, or that the student is overreaching. Pressing the front knee out in line with the second and third toes recruits the outer hip and stabilises the joint.
Collapsing forward. The chest should face the side wall, not the floor. If both shoulders are pointing down, the thoracic rotation has been lost.
Holding the breath. Trikonasana requires the breath to keep working — it is not a pose to enter and then hold still in. Let the ribs move.
Looking straight up when the neck is uncomfortable. The gaze does not have to be towards the upper hand.
Looking down, not up, for neck-sensitive folks
The traditional gaze in Trikonasana is towards the upper hand — which requires the neck to rotate significantly. For anyone with neck sensitivity, disc issues, or general tightness in the cervical spine, this is worth modifying.
A neutral gaze — looking towards the front wall, parallel to the floor — removes the cervical rotation entirely while keeping all the benefits of the pose intact. Some students find that looking slightly downward, towards the lower hand or the floor, is most comfortable.
There is no loss in modifying the gaze. The pose is not measured by where the eyes point.
4. Modifications (Block, Wall, Hand on Shin)
Block under the lower hand: The single most useful modification in Trikonasana. Place a block on its highest, medium, or lowest setting beside the outer edge of the front foot, and let the hand rest lightly on it. This allows the torso to remain long and the chest to open without requiring hamstring flexibility or a collapsing reach.
Wall for balance: Stand with the back foot and back of the body close to a wall. The wall provides feedback — you can feel whether the back of the torso is opening away from the wall (which it should be) or collapsing towards it.
Hand on shin or thigh: If you do not have a block, the hand can rest on the shin or even the thigh. The principle remains the same: the hand is light, the length comes from the legs and the core.
Bent front knee (modified triangle): For students with tight hamstrings or knee sensitivity, a slight bend in the front knee can make the pose both more comfortable and more structurally sound. This is sometimes called Extended Side Angle preparation and is a valid variation in its own right.
5. When to Add It to Your Week
Trikonasana fits naturally into a standing sequence — typically after Warrior I and Warrior II have warmed the legs and hips, before moving to more demanding standing postures.
As a standalone practice: if you have five minutes and want one pose that stretches the lateral body, opens the chest, and wakes up the legs, triangle is a strong choice. Two minutes on each side, with attention to the cues above, is a complete and meaningful practice.
For people who sit for most of the day, Trikonasana addresses the shortening of the lateral hip and the compression of the thoracic spine that extended sitting produces. It is the kind of pose that a body living in a chair tends to need.
Frequently Asked Questions
Do I need to be flexible to do triangle pose?
No. Using a block under the lower hand removes the hamstring flexibility requirement almost entirely. The benefits of the pose — lateral extension, thoracic rotation, leg strength — are fully accessible to students of any flexibility level.
My lower back hurts in triangle pose. What should I do?
First, check whether the front knee has collapsed inward, or whether you are collapsing forward rather than extending laterally. Both are common causes of lower back discomfort in Trikonasana. Raising the hand (via a block or onto the shin) often resolves this immediately. If discomfort persists, please speak to your teacher.
How long should I hold triangle pose?
In a Hatha class, five to eight breaths per side is typical. In a Yin approach, longer holds of two to three minutes allow the connective tissue of the lateral hip to release more deeply.
I am hypermobile — should I be careful in triangle?
Yes. Hypermobile students should focus on muscular engagement rather than passive range of movement. Keep the front knee engaged rather than locked, the lower hand light rather than weight-bearing, and use a block rather than reaching for the floor.
Triangle pose is part of the standing sequence in every Hatha class at Your Ritual Yoga. Come and practise it with alignment cues in real time — it changes the pose considerably to hear the guidance as you hold it.
About the author
Tanya is a Yoga Alliance RYS 200 certified yoga teacher (ID 252157), trained at Devvrat Yoga School in Varkala, India (December 2025). She teaches Hatha and Yin yoga at Your Ritual Yoga in Golders Green, NW11 — a small, intentional studio where every class includes sound healing with Himalayan singing bowls and a post-class herbal tea ritual. www.ritual-yoga.co.uk